Created (c) by Princexells Seyka (Princelling Saki)
Logo Design by
Logo Design by gomed viruzmetamorfobLuezz
Showing posts with label Tips blogger Ragil. Show all posts

Saturday, May 19, 2012

2 How to Create a Spoiler / Open Close Button In Post Blog


good afternoon ..... after a long absence I am posting now is the time to post again: D

This time I will tell how to install the spoiler on the blog post ...... yes even though the posting was a lot wrong but what if I just wanted to share the knowledge ... hehehe

Spoiler is a button that segaja made ​​to hide and display the content of images, text, links, and so forth.

Here are some of the benefits of the Spoiler:

# Save space
# Makes one wonder what is in the Spoiler
# Postings us look more unique and cool
# Make loading faster / lighter if the content of our posts are too long and use images

How to make it follow the steps below,


Copy the code below


<div id="spoiler" style="display:none">
Konten yg ingin disembunyikan
</div>
<button title="Klik to open or close" type="button" onclick="if(document.getElementById('spoiler') .style.display=='none') {document.getElementById('spoiler') .style.display=''}else{document.getElementById('spoiler') .style.display='none'}">Open/Close</button>


caption:
1. Replace "content who want to hide"
     with the content (text, url, image url, script, etc.) who want to hide.
2. Replace the title "Click to open or close" to which title you want.
     Title serves to give information when the mouse hover over the spoiler.
3. Replace the "Open / Close" with the text as you wish,
     The text will be visible on the command spoiler.

To create a spoiler in the post, make spoiler through HTML Edit menu, located top right corner of the box section posts.
all editing done on the menu, if not then the script will not work.


good Luck


Wednesday, May 9, 2012

1 Super Easy Ways to Widget in Blogspot Pagerank Free

Super easy way to make gadget in Blogspot Page Free Rang. Greetings Meet and hopefully not get bored with article article Ragil. for this time I'll make a post about How to make Super Easy Gadget Page Rang at Blogspot Gratisa, is that you can find out Page Rank obtained in your blog, it is very easy

check your blog rank here


Check Page Rank of your Web site pages instantly:
This page rank checking tool is powered by Page Rank Checker service


1. First open this site prchecker.info
2. After typing the name into your blog / web on the existing Colom
3. Then click "Check PR"
4. after you click enter you will be told to "verify code" after you input right click "verify now"
5. After that you will go to the new yard nah there is no description rank your blog, you try to scroll down there is the HTML code and paste it on your blog
6. after you paste it on the "ADD WIDGET" on your next blog will appear on your blog.


So first post of Ragil about Super Easy Ways to Gadgets Page Rang at Blogspot Free and Good luck ....

Tuesday, May 8, 2012

0 I add a social plugin on the blog button


There are a lot of blogs, social bookmarking sites, article sites and other places to promote your blog page, backlink building and spread the word.

If bloggers are usually only make up button and tweet like this that can only promote the blog page on social networking facebook and twitter, no one tried AddThis button that allows visitors to participate in promoting the blog article blog, which means helping to build backlinks to 48 social sites , a lot of blogs, many news sites and many forums that means it will also help build traffic on the blog.

By installing AddThis share button means that we put into Myspace, StumbleUpon, Google, Faceebook like, Email, Blogger, Messenger, Favorites, Twitter / tweet this, Button print / print, Friendster and many more social sites boorkmarking.
Let's start making AddThis social bookmarking button that can be dimanfaakan visitors to participate in sharing our blog:

Create a new account in www.addthis.com.

For the next wordpress blog owner just attach the AddThis Social Bookmarking plugin installed plugin Widget.Setelah AddThis menu will appear on your blog admin page sob.Disanalah buddies can begin to choose the appropriate button also fills AddThis profile id, AddThis AddThis username and password are obtained when creating an account earlier.

For the owner of another blog, select the appropriate button www.Addthis.com and grab the code for posting on Blogger, MySpace, TypePad, Tumblr and common applications such as websites and email newsletter.Untuk Squidoo lenses, just use the settings that allow websites to use the buddy one of the bookmarks or RSS feed.

addthis 1

addthis button 1

0 Install Guide Widget Clock / Clock In Blogspot


good morning bloggers .... This time I will guide you how to install the widget at the blog ....

it may indeed have much to post about this ..
but what's the harm if I share my knowledge with you all,,,,
so I'm proud to be able to do ok .....

Installation was fairly easy way, we just have to copy the script code that will display the clock is then put in the sidebar of our blogger blog. Without having to edit the template that we use

Before I write a tutorial on blogspot tide clock widget, maybe my friends want to see in advance how to look at it, here's the demo.


Next ...
Tutorial Install Widget Clock / Clock To Blogger

Guidelines tide clock widget in Blogger, I divide into two, namely to look old blogger users and blogger users a new look.
How to Put Clock Widget For Blogspot New

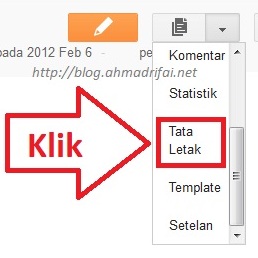
1. Click the Layout
Cara Pasang Widget Jam Di Blogger (http://blog.ahmadrifai.net)


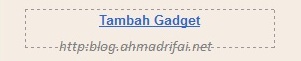
2. Click Add a Gadget / Add A Gadget
Panduan Pasang Widget Jam Di Blogger (http://blog.ahmadrifai.net)


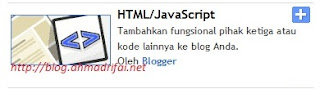
3. Choose Gadget Html / JavaScript
Tutorial Pasang Widget Jam Di Blogger (http://blog.ahmadrifai.net)


4. Enter the code clock widget which I include below
5. Save (you can also move the location of the widget clock gadget by dragging it)


for the clock widget that I use
you can get into www.clocklink.com

For example you can see hours below


good Luck

Sunday, May 6, 2012

0 How To Make Snow Effect In Blog


who does not want to decorate his blog ....? maybe you've been to blog and blog friends that have the effect of snow and you may also want to make a snow effect like that but you do not know .....

nah do not worry ... here I will tell you about how to make a snow effect on the blog .......


Tutorial How To Make Snow Effect In Blog
A. Click the Layout
2. Click Add a Gadget / Add A Gadget
3. Choose Gadget Html / JavaScript
4. Enter code here Snow Effect
5. Save

snow effect code


good luck............
may be useful.......
do not forget my other posts to learn it well

0 Creating Recent Comment Avatar


good morning bloggers ...... been a long time I never post again .... well now i want to post more than passable job bored there is no sharing of information right here ..... hehehe
now i want to post about how to make a recent comment avatar ...

Recent comment, the widget that displays recent comments from our blog. Because a blog is usually identical to the person making the entries were derived from the thoughts of others and can be commented upon. Additionally, it will add spirit to comment and appreciate his comments.

just How to Make Recent Comment Avatar.
1. Login to blogger.com account
2. Select Layout and then add the Add a Gadget> HTML / Javascript
3. Then enter the following code:


<style type="text/css">
ul.tb_recent_comments{list-style:none;margin:0;padding:0;}
.tb_recent_comments li{background:none !important;margin:0 0 6px !important;padding:0 0 6px 0 !important;display:block;clear:both;overflow:hidden;list-style:none;}
.tb_recent_comments li .avatarImage{padding:3px;float:left;margin:0 6px 0 0;position:relative;overflow:hidden;}
.tb_recent_comments li img{padding:0px;position:relative;overflow:hidden;display:block;}
.tb_recent_comments li span{margin-top:4px;color: #666;display: block;font-size: 12px;font-style: italic;line-height: 1.4;}
</style>
<script type="text/javascript">
//<![CDATA[
    // Recent Comments Settings
    var
numComments  = 5,
showAvatar  = true,
avatarSize  = 50,
characters  = 60,
defaultAvatar  = "http://www.gravatar.com/avatar/?d=mm",
hideCredits = true;
//]]>
</script>
<script type="text/javascript" src="http://johnytemplate.googlecode.com/files/recentcomment.js"></script>
<script type="text/javascript" src="http://blognya-ragil.blogspot.com/feeds/comments/default?alt=json&callback=tb_recent_comments&max-results=5"></script>


4. Before storing http://blognya-ragil.blogspot.com replace with your blog URL itself. 5 is the number of comments to be displayed is the size of the avatar 50 and 60 is the number of character comments that appear.
5. Save when done.

Saturday, April 28, 2012

0 Effects Flowers scattered in Blog


this time I will post about how to create the effect of scattered flowers on the blog ...
does not everyone likes to put in effect by reason of making the blog a bit slow loading blog ...

but I just wanted to share information only ....
if anyone likes this steps to install the script is as follows.

First, log into your blogger account to get Dashboard >> Layout >> Edit HTML
Second, search and find the code <body>
Third, then place the following script under the <body> code.


<script language="JavaScript" src="http://www.geocities.com/yono_pati/bunga.js"> </ script>


Fourth, Save Template
Fifth, completed


Now, refresh your blog and make sure your blog has been "scattered flowers"


good luck


Friday, April 27, 2012

0 Marquee for Posting Title


This time I will discuss about the application for the marquee on the blog post title. moving the post title might be a post to be interesting. but if you do not like running with the title of this post just to increase your knowledge of it ..

The trick, ...........

Sign into blogger.com to get in on the Control Panel page (Control Panel), then select a blog and then select the layout and then select Edit HTML. Make sure Expand Widget Templates is checked.
Then we look like the code below : 

<b:includable id='post' var='post'>

<div class='post hentry uncustomized-post-template'>

<a expr:name='data:post.id'/>

<b:if cond='data:post.title'>

<h3 class='post-title entry-title'>

<b:if cond='data:post.link'>

<a expr:href='data:post.link'><data:post.title/></a>

<b:else/>

<b:if cond='data:post.url'>

<a expr:href='data:post.url'><data:post.title/></a>

<b:else/>

<data:post.title/>

</b:if>

</b:if>

</h3>

</b:if>


Then put the marquee html code as below (in red)


<b:includable id='post' var='post'>

<div class='post hentry uncustomized-post-template'>

<a expr:name='data:post.id'/>

<b:if cond='data:post.title'>

<marquee direction='left'><h3 class='post-title entry-title'>

<b:if cond='data:post.link'>

<a expr:href='data:post.link'><data:post.title/></a>

<b:else/>

<b:if cond='data:post.url'>

<a expr:href='data:post.url'><data:post.title/></a>

<b:else/>

<data:post.title/>

</b:if>

</b:if>

</h3></marquee>

</b:if>


completed.
but have not kept our first preview
to make sure everything runs smoothly.


Good luck


Thursday, April 26, 2012

2 Tips to Make Rainbow Effect On Link


huh ... really tired of traveling out to the market continues to want to post again on the blog ....

hmmm ... just ....
today I will post about creating a rainbow effect on a link like this in my blog .. hhehhe


If interested, please follow these tips.


A. Login to enter http://blogger.com to Dashboard

2. Click the Layout (lay out)

3. Click the Edit HTML tab

4. Then search for and find the code <body>

5. Then paste the script below just below <body> 


<script src='http://www.geocities.com/yono_pati/pelangi.js'
type='text/javascript'>
</script>

7. completed

good luck

Wednesday, April 25, 2012

0 How To Make Floating Ads - Ads To Appear Every page Blog Visited


This time I will discuss about creating floating ads on the blog ... surely you've seen ads that float on the blog you visit ....

well this time I will tell her how to install ......

for friends who want to create ads floating ... following is the steps:

1. Login to Blogger
2. Click Layout => Click on Add a Gadget element
3. Choose a theme Gadget HTML / Java Script
4. Fill in the following code in it


<style type="text/css">
#gb{
position:fixed;
top:10px;
z-index:+1000;
}
* html #gb{position:relative;}


.gbcontent{
float:right;
border:2px solid #000000;
background:#F1DEDE;
padding:10px;
}
</style>

<script type="text/javascript">
function showHideGB(){
var gb = document.getElementById("gb");
var w = gb.offsetWidth;
gb.opened ? moveGB(0, 30-w) : moveGB(20-w, 0);
gb.opened = !gb.opened;
}
function moveGB(x0, xf){
var gb = document.getElementById("gb");
var dx = Math.abs(x0-xf) > 10 ? 5 : 1;
var dir = xf>x0 ? 1 : -1;
var x = x0 + dx * dir;
gb.style.top = x.toString() + "px";
if(x0!=xf){setTimeout("moveGB("+x+", "+xf+")", 10);}
}
</script>

<div id="gb">

<div class="gbtab" onclick="showHideGB()"> </div>

<div class="gbcontent">

<div style="text-align:right">
<a href="javascript:showHideGB()">
.:<img src="https://blogger.googleusercontent.com/img/b/R29vZ2xl/AVvXsEhBRVO3qzLzI_EpkGlqLX_bKwP5O-nh6HEF7mpU7tw82R3ZMIUCxsu3AdrsdTzaqau2GLqo9rKDnHeCM-j4-1OcUSMZz9teC7ycunyHJuQfI6HUmAHFOaVaRGlJZrf8t2nQ7dzO_5K18x5T/" title="that appears, click again" alt="closed" />:.
</a>
</div>
<center>

ADVERTISING SCRIPT FRIENDS HERE


</center>

<script type="text/javascript">
var gb = document.getElementById("gb");
gb.style.center = (30-gb.offsetWidth).toString() + "px";
</script></div></div>


5. Click save.


GOOD LUCK


Tuesday, April 24, 2012

0 Greetings Visitors Script Alert


The steps are as follows.


Login to http://blogger.com

Sign In >> Control Panel Layout (layout) >> Add a Gadget >> Add HTML / Javascript.
copy the script below
then save and see the results


<script type="text/javascript">
var yourName = prompt("Who's your name??", "Your name");
</script>


good luck

1 Turning off Right Click on Mouse


how to turn off right click

copy the script below


<script language=JavaScript>
<! -

/ / disable right click

var message = "";
/ / / / / / / / / / / / / / / / / / / / / / / / / / / / / / / / / / /
clickIE function () {if (document.all) {(message) return false;}}
clickNS function (e) {if
(document.layers | | (document.getElementById &&! ​​document.all)) {
if (e.which == 2 | | e.which == 3) {(message) return false;}}}
if (document.layers)
{document.captureEvents (Event.MOUSEDOWN); document.onmousedown = clickNS;}
else {document.onmouseup = clickNS; document.oncontextmenu = clickIE;}

document.oncontextmenu = new Function ("return false")
/ / ->
</ script>


copy the script above in a way


A. Click Layout and choose edit html
2. Find the code <head> Copy the code below.
3. Save.
4. good luck!

Sunday, April 22, 2012

0 create a widget is hidden


Steps - steps are:


1. Go to Blogger Layout then create a new HTML widget.


2. Then my friend just copy paste the script below:


<style type='text/css'>
.fwidget{background:#000;border-radius:5px;bottom:-5px;box-shadow:0 0 5px #fff;color:#fff;float:left;height:25px;margin-left:95px;opacity:.8;overflow:hidden;padding:auto;position:fixed;text-shadow:0 0 5px #000;width:90px;z-index:9;-o-transition:all 2s ease-in-out;-moz-transition:all 2s ease-in-out;-webkit-transition:all 2s ease-in-out}
.fwidget:hover{background:transparent;border:2px solid #000;box-shadow:0 0 15px #000;color:#000;height:450px;margin-left:20px;opacity:1;width:240px}
.fwidget-body{-o-transition:all 1s ease-in-out;-moz-transition:all 1s ease-in-out;-webkit-transition:all 1s ease-in-out}
.fwidget h3{cursor:point;font-size:13px;text-align:center}
</style>

<div class='fwidget'>
<h3>widget title</h3>
<div class='fwidget-body'>
<center>INPUT GUEST BOOK LIKE SCRIPT widget</ceenter>
</div>
</div>


Description:

background: # 000: background color before it is opened # 000 = black
background: transparent: after opening the transparent background color = transparent
bottom:-5px: change the position of the widget is hidden under the bottom to top when wanting a position above
margin-left: 95px: change the value according to the desire to rule the greater the value of his position more to right
position: fixed: if my friend wanted to make this widget does not come when discroll fox moved into position: absolute
height: 25px and width: 90px: the height and width before the fox opened the score
height: 450px and width: 240px: is high and wide after opening
Widget Title: Replace the title of the widget / Post button
INPUT GUEST BOOK LIKE SCRIPT widget: Replace with the script widget that will be installed
<center> and </ ceenter>: get rid if the widget is centered


good Luck


Saturday, April 21, 2012

0 Creating Greeting in accordance with setting time Blogspot


hmm .. create a blog with a greeting in the setting time was cool that we want to welcome visitors to the blog .......

such as the greeting on my post ....
how cool is it??

how to make greeting:


1. Sign in to Blogger, login and go to the Draft.
2. Page Elements and click Add a Gadget
3. Choose HTML / Javascript, and we enter the following code into it:


<marquee align="center">
<span style="font-weight:bold;"></span><script>
var Digital=new Date()
var hours=Digital.getHours()

//Silahkan sesuaikan dengan pesan yang Kita inginkan
if (hours>=5&&hours<=11) //pesan pagi hari (05.00-11.00)
document.write('<b>...:::Selamat Pagi Sahabat! Semoga Pagi Ini menjadi Awal Yang Baik Untuk Memulai Karya:::...</b>')
else if (hours==12) //pesan siang hari (12.00)
document.write('<b>...:::Selamat Siang Sahabat. Terimakasih Telah Menyempatkan Berkunjung di Sela-sela Istirahat Siang Ini:::...</b>')
else if (hours>=13&&hours<=15) //pesan waktu siang hari(13.00-15.00)
document.write('<b>...:::Selamat Siang Sahabat...Terima Kasih Telah Berkunjung Siang Ini:::...</b>')
else if (hours>=15&&hours<=17) //pesan sore hari(15.00-17.00)
document.write('<b>...:::Selamat Sore Sahabat, Terima Kasih Telah Menyempatkan Berkunjung Sore Ini:::...</b>')
else if (hours>=17&&hours<=18) //pesan petang hari (17.00-18.00)
document.write('<b>...:::Selamat Petang Sahabat! Sambil Istirahat Dipersilahkan Menikmati Hidangan Blog Ini, Hehehe:::...</b>')
else if (hours>=18&&hours<=23) //pesan malam hari (18.00-23.00)
document.write('<b>...:::Selamat Malam Sahabat, Terima Kasih Telah Berkunjung:::...</b>')
else //pesan malam mejelang pagi(00.00-04.00)
document.write('<b>...:::Sobat..!!!, Sudah Larut Malam Sobat Masih Sempat Berkunjung.., Terima Kasih Sobat!:::...</b>')
//edit by http://blognya-ragil.blogspot.com
</script></marquee>


4. We save and preview the results
5. Once successful, then we will have blogspot greeting different each time as we want. For example, during the afternoon there will be a good greeting, such as evening there will be a good evening greetings and so on.


GOOD LUCK


Thursday, April 19, 2012

1 Pairs of free SMS widget in Blogger


hey hey hey ......
how are you all?
hmmm ... this time I will post about how to install the free sms widget on the blog ..

just follow the way below

A. First log into your blogger account
2. Click the menu design
3. Click 'Add a Gadget' select HTML / Javascript
4. Copylah script / code the following

<iframe src=http://smsgratis.web.id/wg3/?teks=http://blognya-ragil.blogspot.com/ frameborder=0 style=height:300px;width:400px;>Please upgrade your browser</iframe>

5. Do not forget to Save. Then see the results.

Wednesday, April 18, 2012

2 How to Install Kaskus Emoticon in Comment Blog (with spoilers)


How to Install Emoticon Kaskus


1. Log in to blogger

2. Edit Template (Check the Expand Widget Templates)
Download first template'a keep watch for any errors perhaps irreversibly

3. Find this code </ body>

4. Place this code <script src='http://adhiprimana-com-blog-dofollow.googlecode.com/files/adhiprimana.comBlogDoFollow.js' type='text/javascript'/> above code </ body>

5. Search again this code <b:include data='post' name='comment-form'/>

6. Put the code below above <b:include code data='post' name='comment-form'/>


<br /> <div><input onclick="if(this.parentNode.getElementsByTagName('div')[0].style.display != ''){this.parentNode.getElementsByTagName('div')[0].style.display = '';this.value = 'Sembunyikan Emoticon';}else{this.parentNode.getElementsByTagName('div')[0].style.display = 'none'; this.value = 'Tampilkan';}" type="button" value="Tampilkan Emoticon" /><br /> <div style="display: none;"><br /> <div style="border: 0px solid rgb; padding: 0px; overflow: auto; width:; height: 200px; background-color: #;"><li><img border="0" src="http://static.kaskus.us/images/smilies/s_big_cendol.gif" /><br /> :cendolbig<br /> <img border="0" src="http://static.kaskus.us/images/smilies/s_big_batamerah.gif" /><br /> :batabig<br /> <img border="0" src="http://static.kaskus.us/images/smilies/s_sm_ilovekaskus.gif" /><br /> :ilovekaskus<br /> <img border="0" src="http://static.kaskus.us/images/smilies/cewek.gif" /><br /> :kiss<br /> <img border="0" src="http://static.kaskus.us/images/smilies/najis.gif" /><br /> :najis</li><br /> <li><img border="0" src="http://static.kaskus.us/images/smilies/marah.gif" /><br /> :marah<br /> <img border="0" src="http://static.kaskus.us/images/smilies/s_sm_repost1.gif" /><br /> :repost<br /> <img border="0" src="http://static.kaskus.us/images/smilies/sundul.gif" /><br /> :sup2<br /> <img border="0" src="http://static.kaskus.us/images/smilies/takut.gif" /><br /> :takut<br /> <img border="0" src="http://static.kaskus.us/images/smilies/shakehand2.gif" /><br /> :shakehand2</li><br /> <li><img border="0" src="http://static.kaskus.us/images/smilies/hammer.gif" /><br /> :hammer<br /> <img border="0" src="http://static.kaskus.us/images/smilies/toastcendol.gif" /><br /> :toast<br /> <img border="0" src="http://static.kaskus.us/images/smilies/cystg.gif" /><br /> :cystg<br /> <img border="0" src="http://static.kaskus.us/images/smilies/selamat.gif" /><br /> :selamat<br /> <img border="0" src="http://static.kaskus.us/images/smilies/jempol2.gif" /><br /> :2thumbup</li><br /> <li><img border="0" src="http://static.kaskus.us/images/smilies/matabelo1.gif" /><br /> :matabelo<br /> <img border="0" src="http://static.kaskus.us/images/smilies/request.gif" /><br /> :request<br /> <img border="0" src="http://static.kaskus.us/images/smilies/babyboy1.gif" /><br /> :babyboy1<br /> <img border="0" src="http://static.kaskus.us/images/smilies/sorry.gif" /><br /> :sorry<br /> <img border="0" src="http://static.kaskus.us/images/smilies/traveller.gif" /><br /> :travel</li><br /> <li><img border="0" src="http://static.kaskus.us/images/smilies/kimpoi.gif" /><br /> :kimpoi<br /> <img border="0" src="http://static.kaskus.us/images/smilies/ultah.gif" /><br /> :ultah<br /> <img border="0" src="http://static.kaskus.us/images/smilies/rate5.gif" /><br /> :rate5<br /> <img border="0" src="http://static.kaskus.us/images/smilies/bola.gif" /><br /> :bola<br /> <img border="0" src="http://static.kaskus.us/images/smilies/fd_4.gif" /><br /> :kbgt</li><br /> <li><img border="0" src="http://static.kaskus.us/images/smilies/I-Luv-Indonesia.gif" /><br /> :iloveindonesia<br /> <img border="0" src="http://static.kaskus.us/images/smilies/s_sm_maho.gif" /><br /> :maho<br /> <img border="0" src="http://static.kaskus.us/images/smilies/nosara.gif" /><br /> :nosara<br /> <img border="0" src="http://static.kaskus.us/images/smilies/berduka.gif" /><br /> :berduka<br /> <img border="0" src="http://static.kaskus.us/images/smilies/ngakak.gif" /><br /> :ngakak</li><br /> <li><img border="0" src="http://static.kaskus.us/images/smilies/recseller.gif" /><br /> :recsel<br /> <img border="0" src="http://static.kaskus.us/images/smilies/ngacir2.gif" /><br /> :ngacir2<br /> <img border="0" src="http://static.kaskus.us/images/smilies/bingung.gif" /><br /> :bingung<br /> <img border="0" src="http://static.kaskus.us/images/smilies/capede.gif" /><br /> :cd<br /> <img border="0" src="http://static.kaskus.us/images/smilies/peluk.gif" /><br /> :peluk</li><br /> <li><img border="0" src="http://static.kaskus.us/images/smilies/hoax.gif" /><br /> :hoax<br /> <img border="0" src="http://static.kaskus.us/images/smilies/dp.gif" /><br /> :dp<br /> <img border="0" src="http://static.kaskus.us/images/smilies/malu.gif" /><br /> :malu<br /> <img border="0" src="http://static.kaskus.us/images/smilies/cekpm.gif" /><br /> :cekpm<br /> <img border="0" src="http://static.kaskus.us/images/smilies/jempol1.gif" /><br /> :thumbup</li><br /> <li><img border="0" src="http://static.kaskus.us/images/smilies/angel1.gif" /><br /> :angel1<br /> <img border="0" src="http://static.kaskus.us/images/smilies/kaskus_radio.gif" /><br /> :kr<br /> <img border="0" src="http://static.kaskus.us/images/smilies/nohope.gif" /><br /> :nohope<br /> <img border="0" src="http://static.kaskus.us/images/smilies/ngacir3.gif" /><br /> :ngacir<br /> <img border="0" src="http://static.kaskus.us/images/smilies/salah_kamar.gif" /><br /> :salahkamar</li><br /> <li><img border="0" src="http://static.kaskus.us/images/smilies/cool2.gif" /><br /> :cool<br /> <img border="0" src="http://static.kaskus.us/images/smilies/fd_5.gif" /><br /> :sup<br /> <img border="0" src="http://static.kaskus.us/images/smilies/mewek.gif" /><br /> :mewek<br /> <img border="0" src="http://static.kaskus.us/images/smilies/babyboy.gif" /><br /> :babyboy<br /> <img border="0" src="http://static.kaskus.us/images/smilies/babygirl.gif" /><br /> :babygirl</li><br /> </div></div></div>


7. save template


and see the results

good luck
useful if you do not forget 


Related Posts Plugin for WordPress, Blogger...

Follow With google/twitter/yahoo/AIM/NETLOG/OPENID

follow with facebook

Batman Begins - Help Select

visitor

free counters
Free SEO Backlinks